When newcomer starts to develop a new project the question arises in the rapid establishment of a skeleton for future application. Every AEM project other than “Hello World” should contains server-side business logic, environment specific configurations, page templates, component templates, unit and tests and so on. To keep all this code clean and maintainable we should group it into small pieces (modules). The best practice is to hold Java classes and other content separately. Here we come to the aid of the Apache Maven.
Of course we can start from official documentation and try to understand it with pain and frustration because it is complicated enough for newcomers and some different from simple how-to for Maven.
So let’s see how to create new AEM project in simple steps with Apache Maven (I’m using Linux but for Windows and Mac steps are identical).
Step 1
First of all we have to install Apache Maven (installation instructions)
Step 2
Now we have to configure Maven settings within settings.xml file (see for more options). So open it (or create if it doesn’t exists) and add below options for repository of artifacts and plugins, otherwise Maven couldn’t find some artifacts in central repository
pay attention: Adobe repositories available only with secured HTTP):
<repositories>
    <repository>
        <id>adobe-public-releases</id>
        <name>Adobe Public Repository</name>
        <url>https://repo.adobe.com/nexus/content/groups/public/</url>
        <layout>default</layout>
    </repository>
</repositories>
<pluginRepositories>
    <pluginRepository>
        <id>adobe-public-releases</id>
        <name>Adobe Public Repository</name>
        <url>https://repo.adobe.com/nexus/content/groups/public/</url>
        <layout>default</layout>
    </pluginRepository>
</pluginRepositories>
Step 3
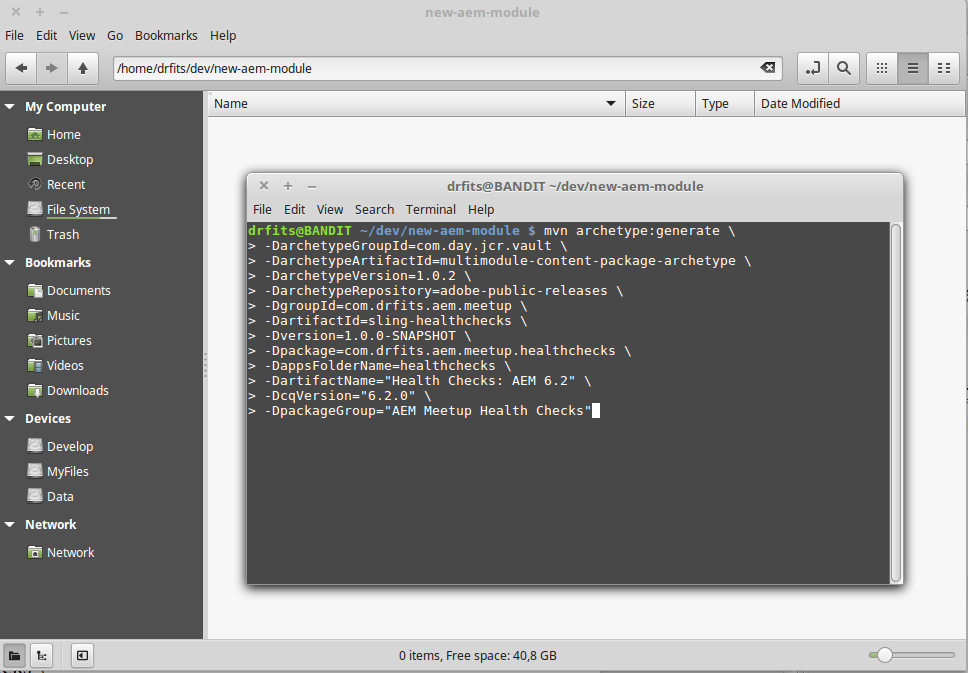
On this step Maven environment is already prepared for AEM developing so we can create folder for new project (for example new-aem-module) and navigate to it within terminal (or console). Then we should generate project from multimodule-content-package-archetype from below command which generates sling-healthchecks folder within current folder with correct project structure:
mvn archetype:generate \
-DarchetypeGroupId=com.day.jcr.vault \
-DarchetypeArtifactId=multimodule-content-package-archetype \
-DarchetypeVersion=1.0.2 \
-DarchetypeRepository=adobe-public-releases \
-DgroupId=com.drfits.aem.meetup \
-DartifactId=sling-healthchecks \
-Dversion=1.0.0-SNAPSHOT \
-Dpackage=com.drfits.aem.meetup.healthchecks \
-DappsFolderName=healthchecks \
-DartifactName="Health Checks: AEM 6.2" \
-DcqVersion="6.2.0" \
-DpackageGroup="AEM Meetup Health Checks"
I believe that all parameters are self-documented and do not require further explanation (thx to Adobe) but if not please feel free to ask in comments.
Step 4
After step 3 we have folder with correct structure for AEM development:
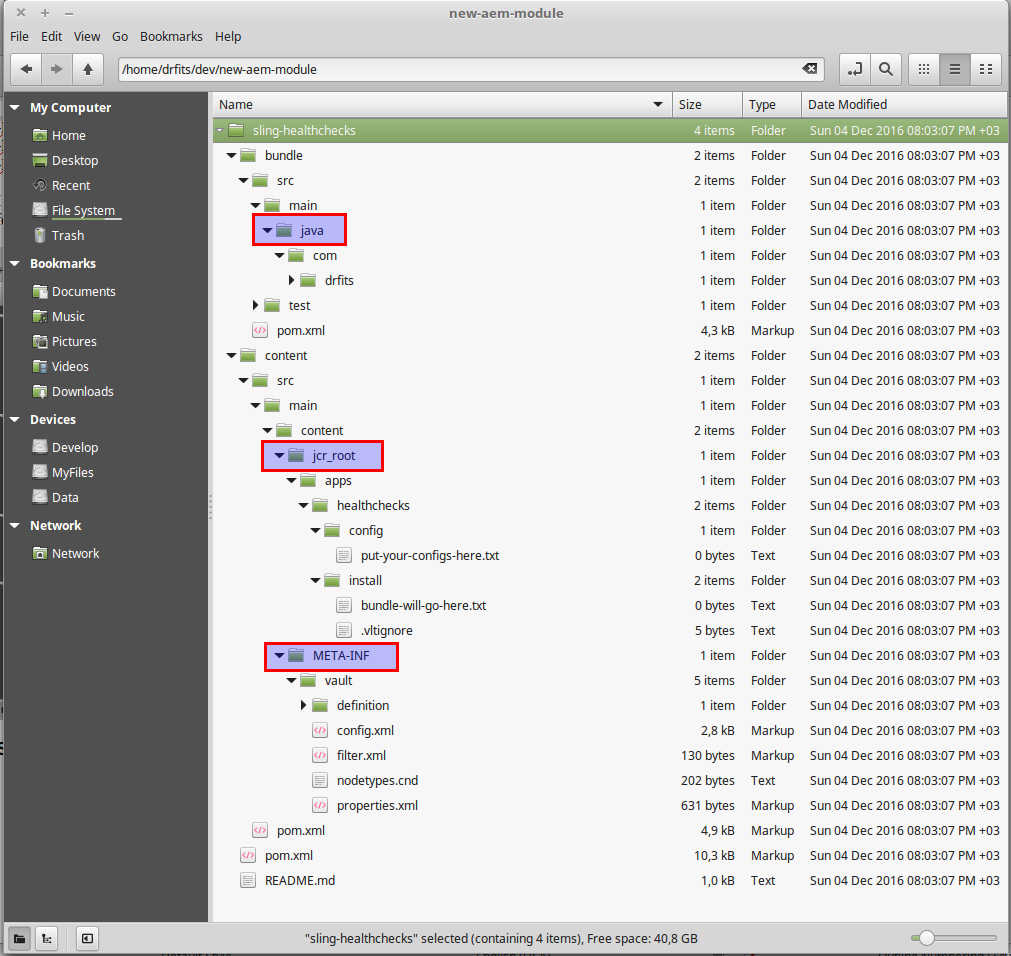
As this article for newcomers I’ve marked folders which requires your additional attention:
- sling-healthchecks/bundle/src/main/java – here we will store all Java classes
- sling-healthchecks/content/src/main/content/jcr_root – here we should place configurations, templates and other content which should be copied on JCR.
- sling-healthchecks/content/src/main/content/META-INF/vault – this folder contains configuration files. At the beginning you need to pay attention to filter.xml which contains deployment rules (by default every filter rule has merge action) which identify how and where content from sling-healthchecks/content/src/main/content/jcr_root folder will be deployed to JCR.
Now we should configure our main sling-healthchecks/pom.xml:
- add new dependency for UberJar (which contains almost all the dependencies for AEM development which provided with AEM):
<dependency> <groupId>com.adobe.aem</groupId> <artifactId>uber-jar</artifactId> <version>6.2.0</version> <classifier>apis</classifier> <scope>provided</scope> </dependency> - Specify in properties where we should to deploy our new bundle if they are different from default:
<!-- ====================================================================== -->
<!-- P R O P E R T I E S -->
<!-- ====================================================================== -->
<properties>
  <crx.host>localhost</crx.host>
  <crx.port>4502</crx.port>
  <crx.username>admin</crx.username>
  <crx.password>admin</crx.password>
  <publish.crx.host>localhost</publish.crx.host>
  <publish.crx.port>4503</publish.crx.port>
  <publish.crx.username>admin</publish.crx.username>
  <publish.crx.password>admin</publish.crx.password>
  <project.build.sourceEncoding>UTF-8</project.build.sourceEncoding>
  <project.reporting.outputEncoding>UTF-8</project.reporting.outputEncoding>
</properties>
Step 5
Now we can simply build and deploy our bundle to the AEM Author and Publish instances with commands which provided in README.md (quoted from it):
- From the root directory, run mvn -PautoInstallPackage clean install to build the bundle and content package and install to a CQ instance.
- From the bundle directory, run mvn -PautoInstallBundle clean install to build just the bundle and install to a CQ instance.
Outcome
In this article we’ve created an AEM project in 5 simple steps for further development and now it’s time to proceed with official documentation from Adobe